
Daylilies | Master Gardener℠ volunteers of Clay County
go.ncsu.edu/readext?873861
en Español / em Português
El inglés es el idioma de control de esta página. En la medida en que haya algún conflicto entre la traducción al inglés y la traducción, el inglés prevalece.
Al hacer clic en el enlace de traducción se activa un servicio de traducción gratuito para convertir la página al español. Al igual que con cualquier traducción por Internet, la conversión no es sensible al contexto y puede que no traduzca el texto en su significado original. NC State Extension no garantiza la exactitud del texto traducido. Por favor, tenga en cuenta que algunas aplicaciones y/o servicios pueden no funcionar como se espera cuando se traducen.
Português
Inglês é o idioma de controle desta página. Na medida que haja algum conflito entre o texto original em Inglês e a tradução, o Inglês prevalece.
Ao clicar no link de tradução, um serviço gratuito de tradução será ativado para converter a página para o Português. Como em qualquer tradução pela internet, a conversão não é sensivel ao contexto e pode não ocorrer a tradução para o significado orginal. O serviço de Extensão da Carolina do Norte (NC State Extension) não garante a exatidão do texto traduzido. Por favor, observe que algumas funções ou serviços podem não funcionar como esperado após a tradução.
English
English is the controlling language of this page. To the extent there is any conflict between the English text and the translation, English controls.
Clicking on the translation link activates a free translation service to convert the page to Spanish. As with any Internet translation, the conversion is not context-sensitive and may not translate the text to its original meaning. NC State Extension does not guarantee the accuracy of the translated text. Please note that some applications and/or services may not function as expected when translated.
Collapse ▲By Eleanor Moyers, Clay County Master Gardener
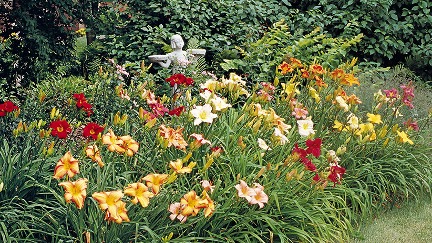
As I crunched along my fading greenish grass, I realized how magnificent my daylilies showed when other plants looked bedraggled in the blazing sun with our lack of rainfall. They are one of the easiest perennials to grow, require almost no maintenance and offer stunning new varieties. This is their season although some begin in mid-spring and others continue into fall. I can’t imagine a garden without them.
The genus, Hemerocallis, comes from the Greek for ‘beauty’ and ‘day’ as each flower lasts only one day. Daylilies originated in Asia and were grown for food and medicinal purposes for thousands of years. Plants were brought to Europe in the 16th century and spread like wildfire. Hybridizers really became industrious in the 1930’s with tens of thousands of named cultivars available today.
Daylilies are not true lilies (and so aren’t nearly as fussy.) They grow in clumps with sword like foliage and tall, leafless scapes or stems that contain the flowers. The size of the plant is the height of the scape from 8 inches to 5 feet. The flower size can be as small as 2 inches or as large as 8. Each scape holds many buds, so even though the bud lasts only one day, the plant can bloom for over a month with many cultivars having more than one bloom period. Generally, daylilies should be planted in full sun or very light shade. They are wonderful at preventing erosion on a bank. It will take about three or four years to reach mature size. They aren’t particularly fussy about soil, but the better the soil, the better the result! Fertilize lightly with a slow release fertilizer in early spring and again in midsummer.
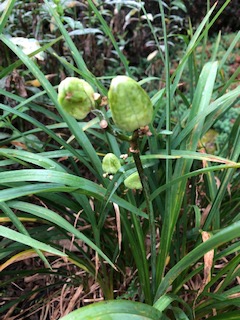
One way to increase and revitalize your plants is to divide a mature clump. Dig up the entire plant being careful to gather all the roots. Use a gardening knife to cut through the plant dividing it into three or four sections. It may be easier to soak the root ball first and then pull apart the sections. Place one section into the original planting hole and spread the others around the garden or give to friends. Daylilies can also be grown from seed. You may have noticed the green bulbous seedpod just after blooming. Allow the pod to turn brown on the plant which will make it easier to break open. The black seeds within can be stored for later use in a dry, cool environment. About four to six weeks before planting, stratify the seeds by placing them into a zip lock bag with moist sand, vermiculite, or a wet paper towel. There are growers who only use water with a few drops of hydrogen peroxide (1 Tbl to 1 quart of water) for this process. When the seeds sprout, place them in well draining potting soil ½ to ¾ inches deep. It will take about two to three years for a good size blooming plant to develop. If not using the pod for seeds, it is a good idea but not necessary to remove it and any spent flowers so the plant puts all its energy into bloom production. It is not too difficult to cross breed daylilies which is why there are so many registered cultivars. There is lots of information available about this
All parts of the daylily are edible. The bulbous part of the root ball can be stir-fried. The flowers make excellent garnishes or their petals strewn on salads. Happy planting!